Oi Sobagi – Stuffed Cucumber Kimchi

Earlier this year I got Lauryn Chun’s “The Kimchi Cookbook: 60 Traditional and Modern Ways to Make and Eat Kimchi” from the library. I have made simple kimchi in the past with Chinese cabbage and bok choi from our garden and I was interested in expanding my repertoire focusing on the things I grow.

Ingredients

One of the ingredients the recipe called for and that was mentioned in several other recipes in the book is Korean chives or or buchu. When I was reading the description I started to wonder if that was one of the plants I was growing, having scavenged it from the weed pile. There are advantages to being in a community garden with a large international population! The description of my odd little clump of chives matched—flat leaves and with a slightly garlicky flavor. I would also add that there is a definite grassiness but I don’t know if that’s normal or because it is in the process of flowering. In any case, I used it.

Stuffin

Stuffing

The stuffing consists of the chives, grated carrot, sugar and Korean hot pepper flakes. I didn’t have any of the pepper flakes so I substituted Penzey’s Medium Hot California style. The proportions I used for everything were a little off from the original recipe because I made a reduced size batch. Next time I will grate the carrot finer and use more of it.

Jarred

After they are salted, drained and stuffed, the cucumbers get packed in a jar and sit at room temperature to ferment for a couple of days. Since it was so warm here I stuck them in the fridge after just a little less than a day to chill them and slow the fermentation.

Tasting

The verdict is in and this recipe is a keeper! I’ve saved a few more from the book to try including another cucumber kimchi and a contemporary stuffed tomato kimchi. I’m looking forward to trying them out.

Have you wandered from the mainstream kimchi path? Where did it take you?

Queer Cheese

Recently we made an Alsatian tart with quark. No, it was’t filled with the subatomic constituents of protons and neutrons. But, then again, I suppose it was. This version of quark is a fresh cheese from central Europe.

Then, as luck would have it, a magazine arrived a few days ago with instructions for making quark from scratch. We felt we had to try it.

The recipe is pretty straightforward. Heat up some whole milk and add some buttermilk when it cools a bit. Let it stands a while, you’ve got quark!

Unfortunately it didn’t work that way for us. Once the required waiting was through we just had a pot of slightly stinky dairy liquid. We didn’t know what went wrong, but suspect the buttermilk culture wasn’t alive. Figuring we had nothing to lose at this point we started again with the heating step and the same liquid, this time putting in some kefir which was practically indistinguishable from the buttermilk. Again, no thickening or curdling.

At this point I took a wild guess that there just wasn’t enough acid and proposed we run our much-abused dairy mess through the foolproof method of making paneer. We warmed the stuff again, stirred in a bit of lemon juice, and in seconds had curds. We poured them into a strainer lined with my super secret substitute for cheesecloth (thoroughly washed sheer curtain panels from a thrift store) gave them a quick rinse with cold water, and wrapped and weighted them to drain.

This morning I unwrapped the creamy, mild cheese and declared it adequate. Not quite quark, not quite paneer, ladies and gentlemen, I give you queer.

20130312-110442.jpg

The co-conspirator thinks it would be fine spread on a bagel or crackers. It needs salt. I may try mixing some herbs into it.

Have you had a kitchen failure you kept hammering at until you got something decent? Please share it with a story or link in the comments.

French Sorrel

One of the interesting phenomena of being able to tend the same kitchen garden year to year is the way the so-called garden seasons can overlap. Garlic planted in the fall emerges in the spring. Biennial crops can be overwintered in the ground, root cellar or crisper drawer to be replanted for seed production. Perennial herbs and fruits return–hopefully–like reliable friends every year.


It’s that last category I used in my first fresh-harvested dish of the season. When I inspected the garden recently one of the emerging signs of life was the French sorrel plant. It’s an herb I tried last year for the first time, not really knowing it was perennial. Since I was anxious to say "I cooked something from this year’s garden!" I grabbed a couple leaves a week later and sliced them up.


Tasting them it was evident the fully flavor hadn’t developed yet. There was a faint hint of lemon and sourness but mostly it just tasted green. I went ahead and scrambled the leaves into some eggs with a little butter. In the end, it wasn’t offensive by any means, but I don’t think it added a whole lot either. In any case, I got my first meal featuring this year’s produce.


Now I’m curious about other uses of French sorrel. It’s a productive plant so when I read the traditional recipes for soup or salmon with sorrel sauce I don’t balk at the amount they call for. I wonder if two of my favorite g0-t0 dishes for green leaves could be adapted to accommodate it, saag and pesto. Do you cook with French sorrel? What are your favorite dishes? Please share in the comments if you have a delicious, brilliant idea.


Today’s leafy, spring-green post is part of Post Produce hosted by Daniel Gasteiger over at Your Small Kitchen Garden. Check it out!

Freezing Garlic

I’ve been having some anxiety lately surrounding garlic. More specifically, I’ve started to worry that all the garlic we grew and stored last summer wouldn’t last until we’d used it.

Garlic is a great vegetable. So many of my favorite dishes include it and it stores so easily that it seemed logical that we should grow a substantial quantity of those funky, fragrant bulbs. In the past, we’ve purchased winter farmers’ market garlic that was dry, dusty and frankly moldy so I wasn’t overly optimistic about keeping garlic in Wisconsin through the winter. When I harvested our crop last summer I hung it in baskets in the basement to cure a while before tying it in garlands to hang in the fruit room/root cellar/server closet—it is the Twenty-First Century after all!

Since that room is visited frequently, I was keeping an eye on the state of the bulbs and have been happy with how they’ve been keeping. Lately, however, I’ve noticed the outer skins on some of the bulbs I’ve brought up to cook with have been more dry and looser. Also, some bulbs are showing sprouting cloves. They’ve got nowhere to grow at this point and are still safe to cook, but I decided that just in case I’d process and freeze some of them. I selected the remaining five bulbs of ‘Tai Lang’ for this project. Incidentally, I’ve found nothing about this cultivar online; Googling it just brings up my own references to growing it. All I know is I bought it at the Westside Community Market and the seller said it was hot.

The first step in processing garlic for freezing is to peel each individual clove. When I’m doing one or two or five for a recipe I just cut off the root end, halve it lengthwise and then flake away the skin with a knife. To peel quantities of garlic I use a faster method. First, separate all the cloves in the bulb and cut off  the root end. Then, lightly crush them with the flat of your knife. Be careful. You’ll end up with a chaotic pile of garlic cloves and papery skins.

Next, get a couple of bowls, preferably stainless steel, that are close to the same size. In a pinch, you can just use a bowl and a plate.  Put your distressed garlic cloves in the bowls and get ready to rumble!

Cover one bowl with the other and sha-a-a-ake vigorously. Listen to the tone and you can actually hear when the cloves have been removed from the skins. It’s pretty cool and I’m sure there’s some big-ass industrial machine out there that uses the same principle to do the same thing. Now you just pick the oh-so-tasty garlic cloves out of the skins and set them aside.

Next, chop the garlic to make it easier to dispense and use. Either coarsely chop it by hand if you have the time and patience. I didn’t so I used a mini food processor. Don’t overdo it. If you want a finer chop later you can always do it then.

The final step is to get some protection on those chopped cloves. Drizzle in a little olive oil and stir it into the chopped garlic. A little goes a long way! The key is to coat the cloves without having them swimming in it. Stir thoroughly so that they’re completely coated. The oil will keep the garlic from turning ugly colors and also make it easier to spoon out the quantity you need when cookin’ time comes around.

Finally, put the oiled garlic in a jar and screw that lid on tightly. Keep it in the freezer and just scoop out however much you need in your future cooking. You’ll thank yourself for putting in the effort now not only for saving yourself the chopping later, but for also saving some produce that may not have lasted until the next crop comes ready.How do you keep your garlic? I’d be interested in hearing new ideas on growing and storing one of my favorite crops. Comment or email to share your ideas.

This riveting, stem-grinding offering is part of Post Produce, hosted by Daniel Gasteiger over at Your Small Kitchen Garden. Check it out!

El Día de San Valentín

On Monday we returned to cold, white Wisconsin from some time in hot, colorful Costa Rica. What a letdown. Fortunately Tuesday was a holiday, I’m still layed off this week, and one of the mementos we brought back from Puerto Jiménez was a cookbook. All the means to compensate for having to come home were in place. The book is “Gallito Pinto: Traditional Recipes from Costa Rica.” I consulted it to devise a menu and went grocery shopping.

The first course was a cocktail I concocted with carambola, also known as starfruit. It’s got sort of a weak flavor but some calvados and lime juice rounded it out and the garnish couldn’t have been more obvious.


For  munching along with the cocktails I whipped up a batch of striped seabass ceviche. We’ve been talking about making ceviche for three years since we had it so often in Ecuador but this is the first time we’ve followed through. It’s so simple there’s really no excuse.


For the salad I took the easy route and did a pseudo-Caesar but with fancy-schmancy heart-shaped eggs. I briefly entertained the possibility of coloring them pink. Maybe next time.


The main course was Bistec Encebollado, better known as steak and onions with Chacletas de Chayote—mashed chayote and cheese stuffed in the exotic fruit’s skin. It was unusual but good. Cheese can make anything good, though. I’d make it again.


For dessert I whipped up a couple of simple mini flans. They weren’t much to look at but tasted delicious. I only wish I had remembered to put some coconut in them. As it was, they were so good I dug in before I remembered to take a picture.


DSCN1818


One traditional dish we did not have but saw a lot of in Costa Rica was the black bean and rice dish called Gallo Pinto. It was served at any or all of the three meals of the day and with all the hiking we were doing was a welcome, high energy dish. I’ve definitely found a use for some of the black beans I grow every year.


Check back to see the wild side of Costa Rica coming soon!

Home-Grown Black Bean Chili

BeanzThere really isn’t much to this recipe but a friend asked about it so I thought I’d try writing it out. It’s just something simple I threw together to use some fresh shelled black beans I had on hand. My Black Valentine bushes produced a second flush of pods late this summer that didn’t have time to ripen and dry before the cold weather hit. You can, of course, cook dry beans to use or even resort to canned beans if you absolutely have to.

  • 2 teaspoons canola oil
  • 1/2 medium white onion, diced
  • 1/4 cup peppers finely diced — blend sweet and hot to taste
  • 2 cloves garlic, minced
  • 2-3 teaspoons chili powder
  • 2 cups diced whole tomatoes
  • 2 cups cooked black beans
  • salt

Heat canola oil in a saucepan and in it sauté the onion and peppers. When they’re softened, add a couple cloves of minced garlic and chili powder. Sauté half a minute more. Add tomatoes and cook until they’re soft. Dump in the black beans and simmer gently to blend the flavors, about 20 minutes. Salt to taste and serve. When I made this I purposely tried to primarily use produce from my own garden and did pretty well. Only the oil, chili powder and salt were purchased. I’m looking into making my own chili powder but it’s going to require a better cumin crop than I had this year–which would be any cumin at all. I was inspired to try the bit of frying the powder with the first round of  veggies from a lot of the Indian recipes I’ve made. I believe the theory is that the more intense "dry" heat brings out the flavor and toasts the spices before adding the liquid component. In any case, this was tasty for being so simple. Doubtless there are many variations I could try, especially in the home-grown vegetable department.

Roasting Peppers — I Figured It Out

This year the only pepper seeds I started for planting in the garden were for an heirloom variety called Chervena Chushka. The plants turned out to be prolific producers and I was able to harvest a good number for roasting.

In the past my attempts at roasting peppers haven’t been entirely successful. The idea is to char the skin so that it rubs off cleanly and easily and in the process the flesh of the pepper is rendered soft, sweet and delicious. The method I previously used consisted of taking the grid off one of the gas burners and laying/holding the pepper directly in the flame. When I tried that this time, I got the same results I always have. The skin blistered, blackened and peeled readily on the bulges of the pepper but stayed fresh and undercooked in the valleys, so to speak. I got frustrated with this process and decided to try the broiler method. I arranged the peppers on a baking sheet and positioned them as close to the broiler element as the oven rack allowed and watched closely as the wider parts began to blister and char while the tips remained red and fresh this time. This wasn’t any better than the flame. Deciding that at least on the stovetop I could tediously direct the flame at the spots that obviously still needed it, I pulled the peppers from the oven. That’s when the discovery happened. Now that the peppers had been pre-roasted or at least had the chill taken off them, they blistered and charred quickly and evenly in the gas flame.

After each pepper was completely roasted I placed it in a pan covered with foil to allow them to steam a little longer and loosen the skin.

After they’d all been roasted and rested, the skins slipped off ridiculously easily revealing the sweet, fragrant flesh.

In the end we stuffed them with polenta and goat cheese and served them with some nice roasted halibut and Tasty Evergreen and Sungold tomatoes also from the garden.

A Quick Garden Update

With temperatures approaching those found on the surface of the sun and humidity in excess of 150% we haven’t been spending a lot of time in the garden this week. Still, an occasional visit is necessary to make sure everything’s OK and to pick the beans so that they keep producing more than we can eat. We tell ourselves we’ll freeze some and eventually we will. We’re currently only picking the Pencil Pod (yellow) and Royal Burgundy (purple) bush beans. The rest of the beans are being grown on to the shell or dried stage. I harvested both yesterday.

All the while I was doing it the resident hawk was all, like “OMG! You’re picking beans! That is so cool!!!”

I also checked how the other crops were coming along, especially the tomatoes and peppers. I picked a couple more really ripe Sungold cherry tomatoes that went straight into dinner’s salad. There are a bunch more that will be coming on soon.

The larger varieties are holding a lot of fruit right now that just needs to start turning red, except of course for the Tasty Evergreen that never will. I wonder how I’ll know they’re ripe. Here are either some Carbon or Italian Heirloom. I forget which.

In the pepper department the first poblano is starting to get some color on it.

It’s going to be dark and tasty while the Jimmy Nardello’s Sweet Italian Frying Pepper near it is turning an inviting bright red.

A good bunch of Early Jalpenos are forming, too.

On the way out of the garden I passed one of the community fruit trees. It’ll be interesting to see if the fruit is allowed to ripen. One of the drawbacks of community gardens is that there is pretty intense competition for shared resources. I don’t even bother looking over the shared raspberry plants anymore. People are so anxious to get them before someone else does that the majority of them are picked when they just start to turn color. For the time being, the little pears are pretty and I can enjoy them at this stage just hanging on the trees.

A Little Appetizer


Sunday was oppressively hot so naturally I decided to go the the garden and take care of a few tasks. I’d been reading up on when to harvest garlic since our plants were showing signs of slowing down. Bottom leaves were browning and drying up as were the tips of most of the rest of the leaves. I decided to take a chance and harvest the whole crop. I’d dug a couple of bulbs over the past week or so and they seemed ok. In the end, counting the two early harvests we ended up with forty-three bulbs from the forty cloves we planted. I think that’s a pretty good success rate. The three double bulbs were all the same variety.

In the process of digging them up, I nicked one of the bulbs. Since it wouldn’t keep for long in its damaged condition, I went ahead and roasted it in a little olive oil. The resulting, sweet/savory paste inspired me to make a little appetizer that ended up comprising most of my dinner. I toasted a couple slices of some grainy bread from Clasen’s which I then further browned in a pan with some olive oil. Honestly, Clasen’s makes some decent pastries, but their country style breads really are the Wonder Bread of artisanal loaves. But, they were two for the price of one so how could I pass that up? Additional heat helps.

I plucked some basil from the pot on the deck and sliced up a tomato from Flyte Family Farm. After spreading the lucious garlic paste on the bread I layed on the tomato slices, sprinkled with some basil ribbons and hit with another drizzle of olive oil. The bread was still too soft, but on the other hand it didn’t shatter and send the toppings flying. I would definitely make this again but with a heartier bread.

Tapas Night!

When no specific dinner plan is in mind and the time to dine draws near, a familiar phrase is uttered in our kitchen–“Tapas Night!” Tapas Night is our cop-out excuse for throwing together leftovers on little plates. No, wait, I take take that back. At one time that might have been true, but I dare say the co-conspirator and I have evolved as cooks and, frankly, Tapas Night has become an opportunity to try out new tastes and small bites from whatever the fridge, pantry and garden present us. Tonight’s was no New Year’s Eve, but it was still pretty special.

After work I went up to the garden to take care of a few things and brought home a bit of the produce. When I got home we talked about dinner, a dish I had an idea for, and the fact that we really didn’t have much of a plan beyond that. Activate Tapas Night. Sorry about the pictures, though. I was more into cooking than paying attention to lighting so most of these suck. I’m not a food stylist so if you have any suggestions on the light and color problems I’d be more than glad to hear them.

The dish I had planned on making was a chilled fava bean and pea soup inspired by our visit last weekend to Nostrano. My recipe was not much like theirs, but I think it showcased the flavor of the legumes. I started with the beans I had previously shelled plus the ones I picked tonight by giving them a long blanch in salted water. They then popped easily out of their skins and into a mason jar.

“Why a mason jar?” you may ask. I shall tell you. We learned recently that the base doohicky on our blender is threaded to match such jars and so is handy for making small batches of things like salad dressings and soups. Cool!


The favas were pureed with some peas (some from the garden, some from the freezer), mint, yogurt, salt and water. The result was delicious! The bean flavor was at the forefront. I served it in my grandmother’s coffee cups. More on those at a later date.

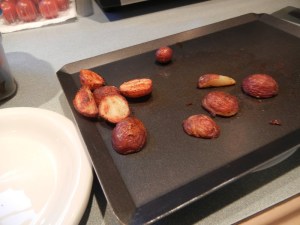
Meanwhile, on another stretch of the kitchen counter the co-conspirator was whipping up something with little potatoes left over from the Fourth’s potato salad and some cherry tomatoes from the Westside Community Market.

The par-boiled taters were given a quick roast in the toaster oven…

…while a tomato sauce was simmering on the stove.

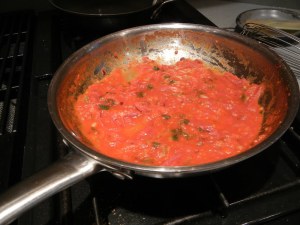
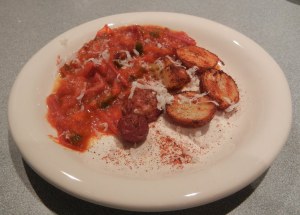
The sauce (based on a recipe in The New Spanish Table) had a nice smoky note from the smoked paprika. We could have used some more potatoes!

Meanwhile, some less-than-baby carrots were waiting. After pruning and tying up the tomatoes, picking the favas and watering the cukes, I thinned the carrots–a task I’d forgotten to do for too long. Consequently I had a handful of carrots that were too big to throw away and just right for a simple small plate creation.

I lightly steamed them with some fresh chervil I’d picked on the outside chance we’d need it for dinner. Incidentally, I steamed them with some of the already hot water I’d used to blanch the fava beans. It had turned red! What’s up with that?

Served with a pinch of sea salt smoked over Welsh oak, they were delicious. The marked difference in flavor between the orange carrots and the yellow carrots made me wonder why anyone would bother to grow the latter, which were part of a gimmicky “rainbow carrots” seed blend.

Meanwhile the zenith of our Tapas Night feast was being prepared on the sidelines. Half of our sweet basil plants have decided to be anemic, pathetic wastes of chlorophyll. The rest, on the other hand, are growing like kudzu and threatening to flower. I reined them in by harvesting a respectable number of stems this evening. Call us unimaginative, but pesto is the first thing that came to mind.

But what to pair it with? Pasta was suggested but quickly abandoned. Why not just sauce it on some sauteed shrimp? OK. Sounds good. Better than good.

The result was a perfect blend of the sweet seafoodiness of the shrimp and the savory, herbal contribution of the basil.

Now that we’re in what I like to call “High Summer” here I’m looking forward to more spontaneous, experimental cooking events. The volume and variety of fresh ingredients that are available now is inspiring. Sometimes we like to put together a more normal main dish/side dish/salad dinner and that’s fine. But when we’ve got the time, energy, ingredients and ideas it’s way fun to just go with what we’ve got and savor the results.